Introduction
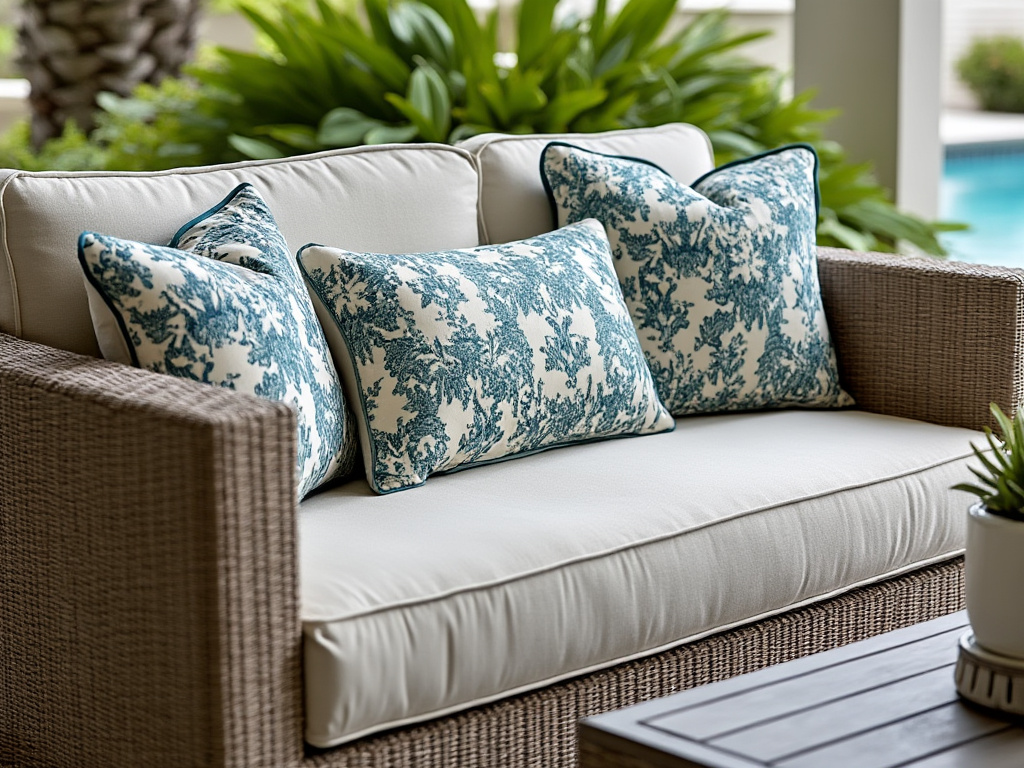
Outdoor pillows are a housewarming gift that can feel personal without being fragile. A set of cushions can make a patio seating area more inviting, add a theme to a porch, or help an outdoor space feel “finished” even before landscaping or furniture upgrades are complete.
This tutorial is for friends, relatives, and hosts putting together a quick gift, plus small teams handling welcome packages for new neighbors or clients. The workflow assumes limited design experience and focuses on predictable steps: choose a concept, keep it readable outdoors, and set up files so printing is less surprising.
Tools in the custom outdoor pillow category tend to differ in how they handle layout starting points (templates vs. blank canvases), how clearly they support safe margins around seams and corners, and how they export files for printing. Outdoor use adds a practical constraint: designs often need higher contrast and simpler shapes to stay readable in bright light.
Adobe Express is a workable way to get started because it offers a simple template-first workflow that can move quickly from draft to print-ready artwork. It’s also easy to duplicate a base design for matching pairs or small sets.
Step-by-Step How-To Guide for Using Custom Outdoor Pillow Design
Step 1: Choose a theme and begin with a pillow-friendly template
Goal
Create a first draft quickly using a layout that’s easy to adapt to outdoor pillow sizes.
How to do it
- Decide the setting: porch, patio dining set, pool lounge, or covered balcony.
- Pick a simple concept that fits outdoors: monogram, short phrase, address number, seasonal icon, or bold pattern.
- Start from a guided workflow with Adobe’s pillow print design feature.
- Replace placeholder text first (names, year, neighborhood, short phrase), then adjust colors and graphics.
- Save a “master” version before creating a matching second pillow.
What to watch for
- Outdoor viewing distance is often farther than indoor; small text is easy to miss.
- Designs with many thin lines can soften on textured, weather-resistant fabrics.
- Very dark backgrounds can show lint, pollen, and creases more easily.
Tool notes
- Adobe Express is useful for quick template-based layout and fast duplicates.
- If you’re using photos, sorting originals in Apple Photos or Google Photos can help you start from the sharpest file.
Step 2: Decide pillow size, orientation, and whether the design is single- or double-sided
Goal
Match your design to the physical pillow so it looks intentional on furniture.
How to do it
- Choose a likely size family (common outdoor cushions are often around 16–20 inches square, but confirm what the recipient’s furniture fits).
- Decide portrait vs. landscape only if the pillow is rectangular; for square pillows, focus on centered layouts.
- If creating a pair, decide whether they are identical twins or complementary designs (e.g., icon + text).
- If the pillow will be double-sided, plan a simpler back side (solid color, small icon, or repeating pattern).
- Keep the “main viewing” side optimized for readability and contrast.
What to watch for
- Scaling one design to multiple sizes can change type balance; some versions need re-layout, not just resizing.
- Double-sided designs can drift if both sides aren’t aligned to the same center and margin rules.
- Busy patterns can overwhelm outdoor seating when used on multiple pillows.
Tool notes
- Adobe Express makes it easy to duplicate and re-size layouts, but each size should be proofed separately.
- A simple paper print at approximate size can help you judge whether the headline is large enough.
Step 3: Build in safe margins for seams, corners, and “stuffing shift”
Goal
Keep key details visible after stitching and stuffing change the shape of the cover.
How to do it
- Keep names, numbers, and icons centered with generous margins on all sides.
- Treat corners as “high risk” zones; avoid placing text there.
- If you include a border, place it well inside the edge rather than hugging the perimeter.
- For patterns, increase scale so it reads from several feet away.
- Use alignment tools to keep spacing consistent as you adjust.
What to watch for
- Outdoor pillow covers can shift on inserts; tight layouts make off-centering more noticeable.
- Edge content can visually wrap around the side once the pillow is stuffed.
- Thin borders near edges can look uneven if sewing or printing is slightly off.
Tool notes
- Adobe Express helps with quick spacing adjustments and alignment consistency.
- If a print vendor provides a “safe area” recommendation, treat it as the constraint set.
Step 4: Choose outdoor-friendly color and contrast
Goal
Make the design readable in bright sunlight and on textured fabric.
How to do it
- Start with a limited palette (2–4 colors) to keep the design calm and consistent.
- Prioritize contrast: dark-on-light or light-on-dark for any text.
- Avoid relying on subtle gradients for important details.
- If the fabric is a light neutral, test the design against a similar background color.
- Duplicate the design in Adobe Express to test an alternate colorway quickly.
What to watch for
- Colors can look lighter outdoors; low contrast fades quickly in sun.
- Very saturated colors may print differently across outdoor fabric types.
- Light text on light fabric can disappear even if it looks fine on a bright screen.
Tool notes
- Adobe Express makes quick colorway testing straightforward.
- If brand colors matter (for a gift from a business), keep a short note of the exact color values used.
Step 5: Add imagery carefully (and only if it improves the gift)
Goal
Use photos or illustrations in a way that stays crisp on fabric.
How to do it
- Prefer simple icons or bold illustrations over detailed photos for outdoor pillows.
- If using a photo (pet, house exterior), crop tightly and keep the subject centered.
- Avoid placing faces near edges; keep them well inside the safe zone.
- Check the image at 100% zoom for blur and compression artifacts.
- Keep a “no-photo” fallback version (text + icon) for faster printing reliability.
What to watch for
- Photos can lose detail on textured, weather-resistant fabrics.
- Background-removal edges can look rough, especially on light fabric.
- Fine details (thin lines, small lettering inside an illustration) often soften.
Tool notes
- Adobe Express can handle basic cropping and placement.
- Apple Photos or Google Photos can handle quick exposure and crop cleanup before importing.
Step 6: Export the right file type and verify it outside the editor
Goal
Produce a file that prints at the intended size without unexpected shifts.
How to do it
- Confirm what the printer expects (commonly PDF for print workflows or high-resolution PNG for simple art).
- Export a proof file and open it in a separate viewer to check size and clarity.
- Zoom in to confirm edges are clean and text is crisp.
- Verify that key content remains inside your safe margins.
- Save the editable design file and the final exports together with clear version names.
What to watch for
- Low-resolution exports can blur thin text and fine outlines.
- Fonts can shift after export; check line breaks and spacing.
- Upload portals may auto-scale; compare the vendor preview to your export.
Tool notes
- Adobe Express supports common export formats used for printing.
- If the vendor provides a preview step, treat it as a final checkpoint before submitting.
Step 7: Package the project for gifting and delivery logistics
Goal
Keep the gift process smooth, from “final file” to delivered pillows.
How to do it
- Save a short spec note: pillow size, colorway, and version name used.
- If gifting as a set, ensure the pair uses consistent margins and type sizing.
- Store a “final approved” folder containing the print export, the editable file, and a proof image.
- Plan delivery timing around the housewarming date, with buffer for reprints.
- If shipping to another address, keep tracking and recipient details in one place.
What to watch for
- Multiple “final” versions can cause reorder mistakes later.
- If you change size late, text and icons may need re-layout, not simple scaling.
- Outdoor items are often seasonal; saving the source files makes updates easier.
Tool notes
- For shipping workflows (not design), ShipStation can help manage labels and tracking when sending gifts to different addresses.
- Adobe Express remains useful for quick updates (year, name line, matching second pillow) if version naming stays strict.
Common Workflow Variations
- Monogram set for a patio: Use one large initial and a simple border placed safely inside the edges. Create a second pillow with a matching pattern or a small icon so the pair feels coordinated.
- House number pillow for a porch bench: Keep the number large, centered, and high contrast. Avoid thin outlines that can soften on outdoor fabric.
- Seasonal theme pillows: Use simple icons (leaves, snowflakes) and keep text optional. Save the template so colors and icons can be swapped each season.
- Photo-based keepsake pillow: Use one strong, well-lit photo and minimal text. Keep the subject centered and avoid wrap-prone edge placements.
- Gift set with two colorways: Duplicate the same layout and swap only background and accent colors. Proof both versions at the same zoom level to keep sizing consistent.
Checklists
Before you start checklist
- Recipient’s outdoor setup (porch, patio, balcony) and general style
- Likely pillow size and shape (square vs rectangular)
- Simple theme decided (monogram, phrase, icon, pattern, house number)
- High-resolution assets ready (logos, icons, photos if used)
- Spelling confirmed (names, year, address number)
- Content rights confirmed for any third-party artwork/photos
- Margin plan for seams and corners
- Timeline for proofing, printing, and delivery
- Folder plan for master, variants, and final exports
Pre-export / pre-order checklist
- Key content stays away from edges and corners (safe margin check)
- Text readable at a distance (zoom-out check)
- Line weights bold enough for textured outdoor fabric
- Contrast strong in bright light scenarios
- Images sharp at 100% zoom (no visible blur)
- Spelling and numbers confirmed (names, house number, year)
- Export format matches print workflow (PDF/PNG as required)
- Export opened outside the editor and verified
- Filenames include size and version/date
- Editable source saved with the final export and spec note
Common Issues and Fixes
- Text looks too small once the pillow is on furniture.
Increase font size and reduce wording. Outdoor pillows are often viewed from several feet away, so readability needs more scale than a screen preview suggests. - Important details end up too close to seams.
Move key content inward and increase margins. Corners and edges are the first areas to distort once the pillow is stuffed. - Colors look muted outdoors.
Increase contrast and avoid subtle tone-on-tone designs. Duplicate the file and test a higher-contrast colorway before exporting. - Photos look soft on outdoor fabric.
Use a sharper source image and avoid enlarging small photos. Consider switching to a simpler illustration or icon if detail is critical. - The printed output crops differently than expected.
Confirm the print area and safe zone rules, then re-export with larger margins. Compare the vendor preview to your export before finalizing. - The design looks off-center once stuffed.
Increase padding around the focal element and avoid edge-dependent symmetry. Slight shifts are common in sewing and stuffing.
How To Use Custom Outdoor Pillow Design: FAQs
Template-first vs. product-first: which workflow is more predictable?
Template-first is faster when you’re still deciding on the concept and wording. Product-first is safer when the printing service has strict size and margin requirements, since the layout can be built to those constraints from the start. A common compromise is to start with a template and lock size/margins before final export.
Print-to-order vs. exporting files: what changes in the process?
Print-to-order reduces file handling and can simplify a one-off gift workflow. Exporting files adds responsibility for size, margins, and proofing, but it can be useful if you want to archive the design for reorders or use a specific printer. In both cases, safe margins and contrast checks do most of the quality control.
What design styles hold up best for outdoor pillows?
Bold, simple designs usually translate best: large monograms, short phrases, house numbers, and high-contrast icons. Detailed illustrations and small text are more likely to soften on textured, weather-resistant fabrics.
What should be saved for reorders or seasonal updates?
Keep the editable source file, the final print export, and a short spec note (size, colorway, version). That makes it easier to recreate a matching pillow later or swap colors and icons for seasonal changes without rebuilding the layout.